 Log In


When it comes to collecting and managing patient information, having a secure and streamlined authorization process is a must. But building and maintaining these forms can be a time-consuming task, especially if you’re relying on manual processes or outdated systems. That’s where no-code tools like Knack come in.
In this guide, we’ll walk you through how to create custom, HIPAA-ready patient authorization forms using Knack. From initial setup to customization, we’ll show you how to build a solution that works for your practice and your patients.
Key Takeaways
- A patient authorization form is a legal document that grants permission for a healthcare provider to disclose or use a patient’s medical information for a specific purpose.
- Knack’s no-code platform provides drag-and-drop functionality, pre-built components, AI assistance, and more to help users build functional forms without code.
- Most patient authorization forms include fields for patient information, authorized party information, authorization details, insurance and payment information, authorized recipients, and terms and agreements.
Understanding Forms in Knack
Forms are one of the most essential tools in any Knack app. They allow users to input data into your database through a clean, user-friendly interface. Knack forms are tied directly to the fields you create in your database tables (also known as “objects”). That means every input in your form—like a text box, dropdown, checkbox, or file upload—corresponds to a field in your database. Once a user submits a form, the data is automatically saved to the appropriate record.
Create HIPAA-Friendly Forms Effortlessly
Knack makes it easy to build powerful forms that support HIPAA-compliant workflows — no coding required. Add custom fields with a few clicks and control exactly how patient data is collected and stored.
Schedule Appointments with Ease
Let patients book appointments through customizable forms with built-in date and time selection. Use workflows to automatically route submissions, send confirmations, or connect with external calendars using integrations like Zapier or Albato.
Collect Digital Consent Forms
Create digital consent forms that outline treatment details, risks, and patient rights. Include signature fields so patients can securely sign online — no paper or clipboards required.
Accept Payments Securely
Collect patient payments directly through your Knack app using secure integrations with Stripe or PayPal. Embed payment forms into your patient portal or send links via email — all tied to patient records automatically.
Connect to the Tools You Use
Knack Flows integrates with HIPAA-aligned tools like Google Sheets, O365 Excel, and document storage solutions via platforms that help your team stay organized and compliant.
Mobile-Friendly Patient Experience
Knack forms are mobile-responsive by default, so patients can register, schedule visits, or update their records from any device — no app download needed.
Keep Patient Data Secure
Knack offers secure user authentication, field-level permissions, and encrypted data transfer to support HIPAA-compliant setups. If you’re a Covered Entity, our team can help you configure best practices and guide you through signing a BAA.
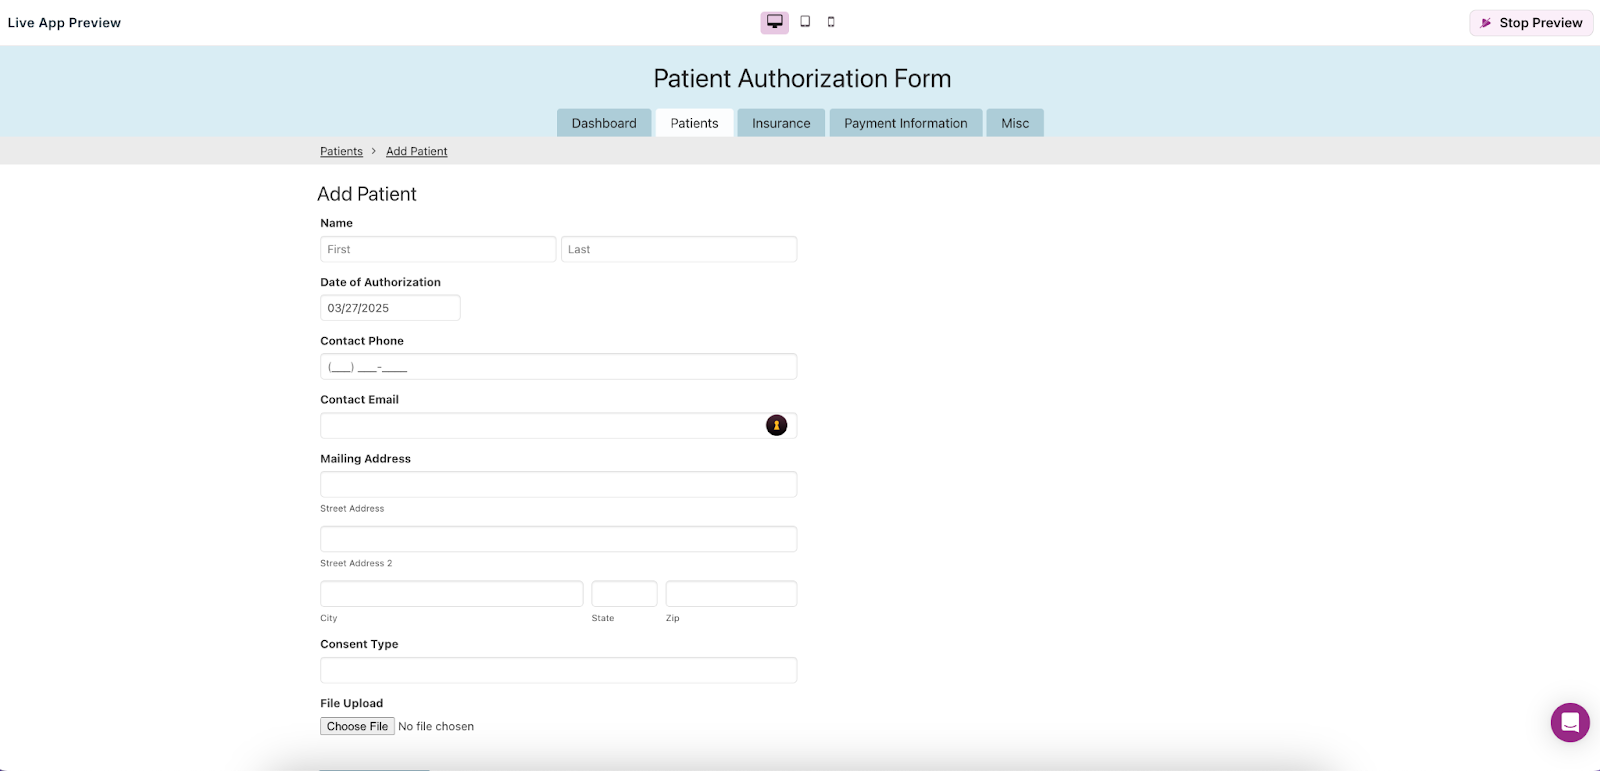
What Do Forms Look Like in a Live App?
In a Live App, Knack forms appear as polished, embedded components on a page. They can be customized to include headings, instructions, and conditional logic based on the user’s inputs or access roles. For example, if you have a table called Patient Authorizations with the following fields:
- Patient Name
- Date of Authorization
- Consent Type
- File Upload
- Notes
A form built from this table would include matching input types that allow users to fill in these details. When the form is submitted, the data is stored directly in the Patient Authorizations table.
Types of Forms You Can Build
Knack gives you flexibility when it comes to the types of forms you can create:
- Forms for Creating New Records: These are perfect for collecting new data, like submitting a new patient authorization form when a patient begins care. Each submission creates a new record in your database.
- Forms for Updating Existing Records: These forms allow users to edit or revise existing entries, such as updating an authorization with a new expiration date or adding follow-up notes.
- Forms for Inserting Connected Records: This form is useful when you need to link data together, such as assigning an authorization form to a specific medical treatment, procedure, or provider through connected fields.
Related: Workflow Automation Guide
Creating a Patient Authorization Form With Knack
Knack’s no-code platform is designed with users of all skill levels in mind. Follow the steps below to build your custom patient authorization form—no coding or IT team required. For more guidance, visit our Learning Center or Developer Docs.
Step 1: Adding a New Form
- In your app, click the “Pages” button located on the left-hand side.
- Select the page you want to add a form to, or add a new page.
- On that page, click the “Add View” button and choose the Form View.
- Select the data table(s) to which your form will connect.
Step 2: Customizing Form Inputs
- Navigate to the Form Menu, click “Settings,” then choose “Add Inputs.”
- Add, edit, or remove the fields you want patients to complete (e.g., patient name, contact information, medical history, etc.).
- Select the data type for each field, such as short text, multiple choice, or yes/no. Make sure the data type you select matches the information the field is intended to collect.
- Mark whether the patient must complete the field and add instructions if necessary.
- Click “Static,” then add dividers and headings to better organize the form and make it more visually appealing.
- Edit any copy within the form to make it more intuitive (e.g., update the “Submit” button to “Upload Patient Records”).
Step 3: Enabling E-Commerce (If Needed)
If you plan to collect appointment fees through your patient authorization form, you must enable e-commerce capabilities and integrate your chosen payment processor. Here’s how:
- Go to the Form Menu and click “Settings.”
- Under the E-Commerce section, choose “Add a Payment View.”.
- Choose which field will be used to show the total amount due.
- Select “Add New Processor” and choose between Stripe and PayPal.
- Enter your payment processor credentials, then click “Add Payment Processor.”
Related: How to Create a Scheduling Form
Enhancing User Experience with Form Rules
Once you’ve built your patient authorization form, the next step is making it intuitive and user-friendly. Form rules let you control what users see and experience based on how they interact with the form. They can help guide users through the form process smoothly while ensuring accurate and complete data collection. All form rules can be configured within the Actions & Rules section of the Form Menu.
Display Rules
Display rules allow you to tailor the form in real time based on user input. For example, if a user selects “Authorization for Release of Information,” you can set a rule to reveal a follow-up field asking for the recipient’s details. You can also dynamically change field labels—so instead of showing a generic “Details” label, the form can update it to say “Please list the third party receiving the information” depending on the user’s choices. This keeps your form relevant, streamlined, and easier to understand.
Submit Rules
Submit rules help shape what happens after a user completes a form. You can choose to redirect users to a specific page, like their portal dashboard or an FAQ page, or you can display a custom confirmation message that includes contact information or instructions for what to expect next. These small touches help reassure users that their form was received and guide them on what to do from there.
Record Actions
Record actions enable you to automate what happens behind the scenes after a form is submitted. You can categorize the authorization form based on the user’s selections—for example, tagging it as “Medical Treatment” or “Record Release” depending on its purpose. You can also use record actions to update related data, such as linking the new authorization to the correct patient record or provider. This ensures your data stays organized and connected without manual intervention.
Automating Email Notifications
Automated email notifications can help streamline communication and ensure that both patients and staff stay informed throughout the authorization process. You can set up emails to trigger instantly when a form is submitted in the Emails section of the Form Menu.
Sending Confirmation Emails
With Knack, you can automatically send a confirmation email to a patient the moment they submit their authorization form. These emails can be fully customized using dynamic field values, allowing you to include personalized content like the patient’s name, the type of authorization submitted, and the date of submission. Adding clear language and next steps to these emails helps reassure patients that their form was received and provides guidance on what comes next.
Sending Admin Notifications
You can also configure notifications for your internal team to make sure the right staff members are alerted as soon as a new patient authorization is submitted. These emails can include key submission details—such as the patient’s name, the authorization type, and any attached files—so your team can take immediate action. Admin notifications are especially helpful for maintaining compliance, streamlining follow-ups, and ensuring no critical forms fall through the cracks.
Advanced Form Features
Knack offers powerful form features that can take your patient authorization process to the next level—still without any coding. These advanced tools help you build smarter forms that are more dynamic, personalized, and responsive to real-world workflows.
Using Connection Fields
Connection fields allow you to link your patient authorization forms to related data, like specific doctors, treatments, or insurance plans. For example, when a patient submits an authorization, they can select their treating physician or the procedure it’s related to, and that information is automatically tied to the corresponding records in your database.
You can even filter these fields so users only see relevant options, like doctors in their clinic or treatments tied to their care plan, making selection faster and more accurate. To do this, open the Connection Field’s settings in your form and set display rules or filters based on other field values.
Related: How to Create a Payment Form (Guide)
Adding Custom Options for Multiple Choice Fields
Sometimes a patient’s response won’t fit neatly into a predefined list. With Knack, you can allow users to add custom options to dropdown or radio button fields. For instance, if you’re collecting the reason for authorization and a patient selects “Other,” you can prompt them to type in their own explanation.
This feature keeps your data structured while still giving users the flexibility to provide details that may fall outside the standard choices. To implement this, create a standard multiple choice field and add “Other” as an option. Then, use a display rule to show a text input field only when “Other” is selected.
Using Forms for Calculations
Knack also lets you incorporate automated calculations directly into your forms. A common example is calculating an authorization expiration date based on the submission date. These calculations reduce the need for manual entry, lower the risk of mistakes, and ensure that your records stay consistent and accurate as soon as they’re created.
To enable calculations, create equation fields in your database and include them in the form. These fields will update automatically as users enter values into the related fields.
Design and User Experience Considerations
Even the most functional patient authorization form can fall short if it’s not designed with the user experience in mind. A well-designed form not only looks professional but also makes it easier for users to complete and submit accurate information.
Form Length and Structure
Keeping your form concise is key. Aim to include only the fields that are absolutely necessary for submission, and make optional fields clearly marked. Grouping related fields into logical sections, such as “Patient Information,” “Authorization Details,” and “Terms & Agreement,” also makes the form easier to navigate and understand.
Accessibility and Mobile-Friendliness
Your patient authorization form should be just as easy to complete on a smartphone as it is on a desktop. Knack’s responsive design makes this possible, but you can take it a step further by providing clear instructions for each field and using larger input areas where appropriate. For longer forms, consider including a progress bar so users know how much they have left to complete. This can help reduce form abandonment and improve overall satisfaction.
Confirmation and Follow-Up
After a patient submits their form, be sure to acknowledge it with a clear thank-you message or redirect them to a confirmation page. This is also a great place to provide next steps, such as how long it typically takes to process the authorization, or who to contact if they have questions. Adding this extra layer of communication helps build trust and keeps users informed.
What Should Go in a Patient Authorization Form?
While every healthcare setting comes with its own unique requirements, most patient authorization forms include the following information:
1. Patient Information
- Full name (first and last name)
- Date of birth
- Email address
- Phone number
- Mailing address
2. Authorized Party Information
- Full name of authorized representative (if applicable)
- Relationship to patient
- Contact information
3. Authorization Details
- Type of authorization (e.g., Release of Information, Treatment Authorization)
- Specific information being authorized (e.g., medical records, billing details)
- Purpose of authorization (e.g., insurance claim, referral)
- Expiration date of authorization
4. Insurance and Payment Information
- Insurance provider name
- Policy number
- Upload insurance card
- Payment information
5. Authorized Recipients
- Name of healthcare provider or organization
- Contact information for recipient
- Method of information release (e.g., email, fax, physical copy)
6. Terms and Agreements
- Acknowledgment of voluntary authorization
- Right to revoke authorization (conditions and process)
- Digital signature field
7. Optional but Useful Information
Although these elements aren’t required, they can help healthcare practices provide better care and expand their audiences.
Additional Questions
- How did you hear about our services?
- Preferred communication method
References
- Contact information for referring physician
- Upload supporting documents
- Contact information for questions
Get Started With Knack
Creating patient authorization forms doesn’t have to be a time-consuming or technical process. With Knack’s intuitive drag-and-drop builder, pre-built form components, and customizable workflows, you can quickly design forms that are both powerful and easy for patients and staff to use. From dynamic display rules and automated email notifications to connected records and mobile-friendly layouts, Knack gives you all the tools you need to build secure, efficient, and fully tailored patient authorization forms.
Ready to build a smarter, more responsive healthcare workflow in just a few clicks? Sign up with Knack and start building for free today!
Need a HIPAA-compliant solution? Contact our team to learn more about HIPAA plans and how we can support your compliance needs.


